
|
Tires & Wheels |
Check all the lug nuts on each of the tires. Re-torque all lug nuts. |
|
Battery |
Check the positive and negative terminal connections. Clean if necessary. |
|
Chassis |
Check the frame hardware and roll cage bolts. Retorque if necessary. |
|
CVT |
Inspect & check the primary and secondary sheeves for debris and wear. Clean if necessary. |
|
CVT |
Inspect the CVT belt for wear and tear. Replace if necessary. |
|
Engine Air Filter |
Inspect & check, clean, and replace if necessary. |
|
Exhaust System |
Inspect & check for loose hardware and tighten clamps. Retorque if necessary. |
|
Fuel System |
Power on the vehicle, Inspect & check the plumbing lines & fittings for leaks, cuts, tears, abrasions, and loose connections. Replace if necessary. |
|
Cooling Plumbing |
Power on the vehicle, Inspect & check the plumbing lines & fittings for leaks, cuts, tears, abrasions, and loose connections. Replace if necessary. |
|
Suspension |
Inspect & check all pivots for play, replace if movement is excessive. Inspect jam-nuts, tighten if necessary. |
|
Safety Harness Straps |
Inspect & check the safety harness for any excessive wear, tear, fraying, or damage to the straps. Change if necessary. |
|
Safety Harness Latches |
Inspect & check the safety harnesses latches for any debris, obstructions, or excessive play. Change if necessary. |
|
Battery |
Inspect & check the positive and negative terminal connections. Clean if necessary. |
|
Brakes |
Inspect & check the thickness of the brake pads and replace if necessary. |
|
CVT |
Inspect & check the inner surfaces of the primary and secondary sheeves for debris and wear. Clean if necessary. |
|
Differential, Front |
Inspect & check the level and condition of the front differential oil. Change if necessary. |
|
Differential, Rear |
Inspect & check the level and condition of the rear differential oil. Change if necessary. |
|
Engine Oil |
Inspect & check engine oil level. Change the engine oil and primary oil filter on tank. |
|
Engine Air Filter |
Inspect & check, clean, and replace if necessary. |
|
Fuel System |
Power on the vehicle, Inspect & check the plumbing lines & fittings for leaks, cuts, tears, abrasions, and loose connections. Replace if necessary. |
|
Fluids |
Inspect & check all fluid levels: power steering, brakes, engine oil, |
|
Motor Mounts |
Inspect & check for wear and replace if necessary |
|
CV Axles |
Grease CV joints. |
|
Inspect & check all pivots for play, replace if necessary. Inspect jam-nuts, tighten if necessary. |
|
|
Inspect & check the tie rods & steering shaft for play, replace if necessary. |
|
|
Battery |
Inspect terminal connections, clean if necessary. |
|
Clutches |
Inspect primary and secondary sheeves for wear. Inspect CVT belt for wear and tear, replace if necessary. |
|
Fuel System |
Power on vehicle, inspect plumbing lines & fittings for leaks, cuts, tears, abrasions, and loose connections. |
|
Alignment – Front |
Check camber, toe, and adjust parts if necessary. |
|
Alignment – Rear |
Check axle plunge at droop. |
|
Battery |
Inspect terminal connections, clean if necessary. |
|
Blow Off-Valve |
Remove, disassemble, inspect, reapply grease, and reinstall. |
|
Brakes |
Inspect brake pads and replace if worn. |
|
Battery |
Inspect terminal connections, clean if necessary. |
|
Clutches |
Inspect primary and secondary sheeves for wear. Inspect CVT belt for wear and tear, replace if necessary. |
|
Fuel System |
Power on vehicle, inspect plumbing lines & fittings for leaks, cuts, tears, abrasions, and loose connections. |
|
Battery |
Check the positive and negative terminal connections. Clean if necessary. |
|
Brakes |
Check the thickness of the brake pads and replace if necessary. |
|
CVT |
Check the inner surfaces of the primary and secondary sheeves for debris and wear. Clean if necessary. |
|
Differential, Front |
Check the level and condition of the front differential oil. Change if necessary. |
|
Differential, Rear |
Check the level and condition of the rear differential oil. Change if necessary. |
|
Engine Oil |
Inspect & check engine oil level. Change the engine oil if necessary. |
|
Engine Air Filter |
Check, clean, and replace if necessary. |
|
Fuel System |
Power on the vehicle, check the plumbing lines & fittings for leaks, cuts, tears, abrasions, and loose connections. Replace if necessary. |
|
Motor Mounts |
Check for wear and replace if necessary. |
|
CV Axles |
Grease CV joints at full droop (4 oz syringe). |
|
Check all pivots for play, replace if necessary. Inspect jam-nuts, tighten if necessary. |
|
|
Battery |
Inspect terminal connections, clean if necessary. |
|
Clutches |
Inspect primary and secondary sheeves for wear. Inspect CVT belt for wear and tear, replace if necessary. |
|
Fuel System |
Power on vehicle, inspect plumbing lines & fittings for leaks, cuts, tears, abrasions, and loose connections. |
|
Alignment – Front |
Check camber, toe, and adjust parts if necessary. |
|
Alignment – Rear |
Check axle plunge at droop, target is ~0.25” . |
|
Battery |
Inspect terminal connections, clean if necessary. |
|
Blow Off-Valve |
Remove, disassemble, inspect, reapply grease, and reinstall. |
|
Battery |
Inspect terminal connections, clean if necessary. |
|
Clutches |
Inspect primary and secondary sheeves for wear. Inspect CVT belt for wear and tear, replace if necessary. |
|
Fuel System |
Power on vehicle, inspect plumbing lines & fittings for leaks, cuts, tears, abrasions, and loose connections. |
|
Battery |
Check the positive and negative terminal connections. Clean if necessary. |
|
Brakes |
Check the thickness of the brake pads and replace if necessary. |
|
CVT |
Check the inner surfaces of the primary and secondary sheeves for debris and wear. Clean if necessary. |
|
Differential, Front |
Check the level and condition of the front differential oil. Change if necessary. |
|
Differential, Rear |
Check the level and condition of the rear differential oil. Change if necessary. |
|
Engine Oil |
Inspect & check engine oil level. Change the engine oil and primary oil filter on tank. |
|
Engine Air Filter |
Check, clean, and replace if necessary. |
|
Fuel System |
Power on the vehicle, check the plumbing lines & fittings for leaks, cuts, tears, abrasions, and loose connections. Replace if necessary. |
|
Motor Mounts |
Check for wear and replace if necessary. |
|
Check all pivots for play, replace if necessary. Inspect jam-nuts, tighten if necessary. |
|
|
Battery |
Inspect terminal connections, clean if necessary. |
|
Clutches |
Inspect primary and secondary sheeves for wear. Inspect CVT belt for wear and tear, replace if necessary. |
|
Fuel System |
Power on vehicle, inspect plumbing lines & fittings for leaks, cuts, tears, abrasions, and loose connections. |
|
Alignment – Front |
Check camber, toe, and adjust parts if necessary. |
|
Alignment – Rear |
Check axle plunge at droop, target is ~0.25” . |
|
Battery |
Inspect terminal connections, clean if necessary. |
|
Blow Off-Valve |
Remove, disassemble, inspect, reapply grease, and reinstall. |
|
Battery |
Inspect terminal connections, clean if necessary. |
|
Clutches |
Inspect primary and secondary sheeves for wear. Inspect CVT belt for wear and tear, replace if necessary. |
|
Fuel System |
Power on vehicle, inspect plumbing lines & fittings for leaks, cuts, tears, abrasions, and loose connections. |
|
Battery |
Check the positive and negative terminal connections. Clean if necessary. |
|
Brakes |
Check the thickness of the brake pads and replace if necessary. |
|
CVT |
Check the inner surfaces of the primary and secondary sheeves for debris and wear. Clean if necessary. |
|
Differential, Front |
Check the level and condition of the front differential oil. Change if necessary. |
|
Differential, Rear |
Check the level and condition of the rear differential oil. Change if necessary. |
|
Engine Oil |
Inspect & check engine oil level. Change the engine oil if necessary. |
|
Engine Air Filter |
Check, clean, and replace if necessary. |
|
Fuel System |
Power on the vehicle, check the plumbing lines & fittings for leaks, cuts, tears, abrasions, and loose connections. Replace if necessary. |
|
Motor Mounts |
Check for wear and replace if necessary. |
|
Check all pivots for play, replace if necessary. Inspect jam-nuts, tighten if necessary. |
|
|
Battery |
Inspect terminal connections, clean if necessary. |
|
Clutches |
Inspect primary and secondary sheeves for wear. Inspect CVT belt for wear and tear, replace if necessary. |
|
Fuel System |
Power on vehicle, inspect plumbing lines & fittings for leaks, cuts, tears, abrasions, and loose connections. |
|
Alignment – Front |
Check camber, toe, and adjust parts if necessary. |
|
Alignment – Rear |
Check axle plunge at droop, target is ~0.25” . |
|
Battery |
Inspect terminal connections, clean if necessary. |
|
Blow Off-Valve |
Remove, disassemble, inspect, reapply grease, and reinstall. |
|
Battery |
Inspect terminal connections, clean if necessary. |
|
Clutches |
Inspect primary and secondary sheeves for wear. Inspect CVT belt for wear and tear, replace if necessary. |
|
Fuel System |
Power on vehicle, inspect plumbing lines & fittings for leaks, cuts, tears, abrasions, and loose connections. |
|
Battery |
Check the positive and negative terminal connections. Clean if necessary. |
|
Brakes |
Check the thickness of the brake pads and replace if necessary. |
|
CVT |
Check the inner surfaces of the primary and secondary sheeves for debris and wear. Clean if necessary. |
|
Differential, Front |
Check the level and condition of the front differential oil. Change if necessary. |
|
Differential, Rear |
Check the level and condition of the rear differential oil. Change if necessary. |
|
Engine Oil |
Inspect & check engine oil level. Change the engine oil and primary oil filter on tank. |
|
Engine Air Filter |
Check, clean, and replace if necessary. |
|
Fuel System |
Power on the vehicle, check the plumbing lines & fittings for leaks, cuts, tears, abrasions, and loose connections. Replace if necessary. |
|
Motor Mounts |
Check for wear and replace if necessary. |
|
Check all pivots for play, replace if necessary. Inspect jam-nuts, tighten if necessary. |
|
|
Battery |
Inspect terminal connections, clean if necessary. |
|
Clutches |
Inspect primary and secondary sheeves for wear. Inspect CVT belt for wear and tear, replace if necessary. |
|
Fuel System |
Power on vehicle, inspect plumbing lines & fittings for leaks, cuts, tears, abrasions, and loose connections. |
|
Alignment – Front |
Check camber, toe, and adjust parts if necessary. |
|
Alignment – Rear |
Check axle plunge at droop, target is ~0.25” . |
|
Battery |
Inspect terminal connections, clean if necessary. |
|
Blow Off-Valve |
Remove, disassemble, inspect, reapply grease, and reinstall. |
|
Battery |
Inspect terminal connections, clean if necessary. |
|
Clutches |
Inspect primary and secondary sheeves for wear. Inspect CVT belt for wear and tear, replace if necessary. |
|
Fuel System |
Power on vehicle, inspect plumbing lines & fittings for leaks, cuts, tears, abrasions, and loose connections. |
|
Battery |
Check the positive and negative terminal connections. Clean if necessary. |
|
Brakes |
Check the thickness of the brake pads and replace if necessary. |
|
CVT |
Check the inner surfaces of the primary and secondary sheeves for debris and wear. Clean if necessary. |
|
Differential, Front |
Check the level and condition of the front differential oil. Change if necessary. |
|
Differential, Rear |
Check the level and condition of the rear differential oil. Change if necessary. |
|
Engine Oil |
Inspect & check engine oil level. Change the engine oil if necessary. |
|
Engine Air Filter |
Check, clean, and replace if necessary. |
|
Fuel System |
Power on the vehicle, check the plumbing lines & fittings for leaks, cuts, tears, abrasions, and loose connections. Replace if necessary. |
|
Motor Mounts |
Check for wear and replace if necessary. |
|
Check all pivots for play, replace if necessary. Inspect jam-nuts, tighten if necessary. |
|
|
Battery |
Inspect terminal connections, clean if necessary. |
|
Clutches |
Inspect primary and secondary sheeves for wear. Inspect CVT belt for wear and tear, replace if necessary. |
|
Fuel System |
Power on vehicle, inspect plumbing lines & fittings for leaks, cuts, tears, abrasions, and loose connections. |
|
Alignment – Front |
Check camber, toe, and adjust parts if necessary. |
|
Alignment – Rear |
Check axle plunge at droop, target is ~0.25” . |
|
Battery |
Inspect terminal connections, clean if necessary. |
|
Blow Off- Valve |
Remove, disassemble, inspect, reapply grease, and reinstall. |
|
Battery |
Inspect terminal connections, clean if necessary. |
|
Clutches |
Inspect primary and secondary sheeves for wear. Inspect CVT belt for wear and tear, replace if necessary. |
|
Fuel System |
Power on vehicle, inspect plumbing lines & fittings for leaks, cuts, tears, abrasions, and loose connections. |
|
SWEPCO 715 Hydraulic Oil |
REFER TO SECTION 4.6 |
1.00 0.25 0.95 |
qt gal L |
|
|
Running the vehicle with an insufficient amount of oil will cause severe damage to the engine. |
1. Ensure the vehicle is positioned level on a flat plane and stationery.
2. Clean and clear any dirt, sand or debris around the engine, oil tank and rear transmission.
3. Place clean containers underneath the oil tank and the motor oil pan.
4. Remove ① the drain plug from the oil tank.o Size: 17mm socket
5. Allow the used oil to drain.
6. Open ② the top of the oil tank.
8. Allow the used oil to drain.
o Apply a small amount of new oil to the o-ring of the oil filter when installing.
o Torque: 15 ft. lbs (20 Nm) 11. Remove Tail-cage Skid Plate.
12. Remove ⑤ the drain plug from the oil pan on the motor.
13.Allow the used oil to drain.
14. Replace ⑤ the drain plug for the oil pan on the motor.
15.Remove ⑥ the drain plug on the engine block oil filter housing cover.
16.Allow the used oil to drain.
17. Remove ⑦ the engine block oil filter housing cover by removing the three hex bolts.
18.Remove ⑧ the engine block cartridge filter.
o If the cartridge is paper, replace it immediately with a steel cartridge.
o If the cartridge is steel, ensure it is clean. 19.Reinstall ⑦ the engine block oil filter housing
20.Reinstall ⑥ the drain plug on the engine block oil filter housing cover.
21.Add new oil into the system through the top of the oil tank.
22. Fill until oil is visible on the sight tube approximately 1.00’’ above the cold fill line.
23.Prime the oil pump by removing ⑨ the bleed screw.
24.Allow oil to drain out of ⑨ the bleed screw
hole until it stops bubbling. 25.Replace ⑨ the bleed screw.
|
|
|
Slight positive pressure inside the system can speed up the oil priming process. This can be done by removing the spark plugs and turning the engine over until at least 10 psi (69 kPa) of oil pressure is built up. Make sure the spark plugs are reinstalled before starting up the engine. |
26.Start the engine, the oil level will go down. 27.Add oil until the level is at the cold fill line.
28.Close the top of the oil tank. 29.Check for leaks.
30.Allow engine to reach operating temperature.
31. Inspect the oil level on the sight tube, it should be near the full hot line. 32.Check for leaks again.
33.Re install tail-cage skid plate.
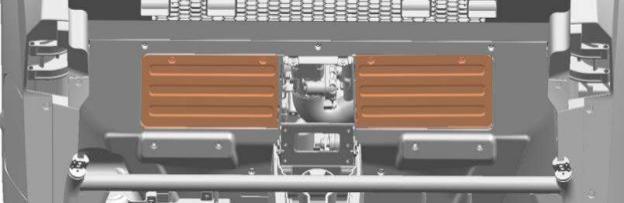
The engine access panel is located behind the seats on the frame of the vehicle. Remove the seats and remove the access panels to reach the engine for servicing and maintenance.
1. Ensure the vehicle is positioned level on a flat plane and stationery.
2. Remove ① the fill plug. a. Size: 8mm allen
Oil should be sitting on the bottom threads of the fill plug hole.
4. If fluid level is low, follow the change procedures of this section.
5. If fluid level is acceptable, reinstall ① fill plug. a. Size: 8mm allen
b. Torque: 25 ft. lbs. (33 Nm) DO NOT OVERTORQUE
1. Ensure the vehicle is positioned level on a flat plane and stationery.
2. Place an oil drain pan underneath.
3. Remove ① the fill plug. a. Size: 8mm allen
4. Remove ② the drain plug and allow the oil to drain completely.
5. Reinstall ② the drain plug.
b. Torque: 25 ft. lbs. (33 Nm) DO NOT OVERTORQUE
6. Add the recommended fluid as necessary.
7. Reinstall ① the fill plug. a. Size: 8mm allen
b. Torque: 25 ft. lbs. (33 Nm) DO NOT OVERTORQUE
1. Ensure the vehicle is positioned level on a flat plane and stationery.
2. Remove ① the fill plug. a. Size: 8mm allen
Oil should be sitting on the bottom threads of the fill plug hole.
4. If fluid level is low, follow the change procedures of this section.
5. If fluid level is acceptable, reinstall ① the fill plug.
b. Torque: 25 ft. lbs. (33 Nm) DO NOT OVER TORQUE
1. Ensure the vehicle is positioned level on a flat plane and stationery.
2. Place an oil drain pan underneath the rear gearbox.
3. Remove ① the fill plug located on the bottom right of the rear gearbox.
6. Reinstall ② the drain plug. a. Size: 8mm allen
b. Torque: 25 ft. lbs. (33 Nm) DO NOT OVER TORQUE
7. Add the recommended fluid as necessary.
8. Reinstall ① the fill plug. a. Size: 8mm allen
b. Torque: 25 ft. lbs. (33 Nm) DO NOT OVER TORQUE
1. Ensure the vehicle is positioned level on a flat plane and stationery.
2. Washand clean the vehicle, ensure all dirt, dust and grease is removed from axles.
3. Break loose lug nuts of the wheels with the axles that are being serviced.
5. Put the vehicle into neutral.
8. Remove retaining plate bolts.
9. Remove axle nut retainer plate. 10.Remove axle nut and washer.
11. Remove hub/rotor assembly by pulling it off.
12. Rotate the axle so that the set screw can be accessed through the holes in the transmission.
13. Remove ① the first locking set screw (acts as ajam nut).
14. Loosen ② the second locking set screw by turning it counterclockwise two (2) and a half (1/2) full turns to release the retaining ring.
o Size: 1/8” allen (long) 15.Pull axle out.
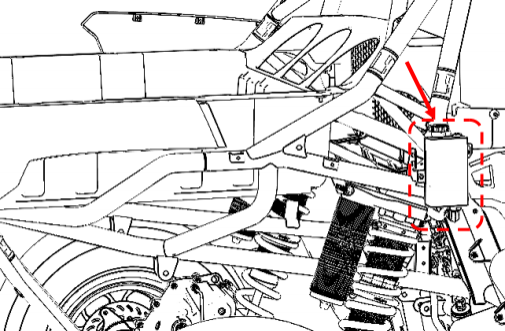
The hydraulic fluid used in the power steering system should be checked according to the preventative maintenance scheduling. Use synthetic power steering fluid. Remove the rear right fender to access the power steering reservoir.
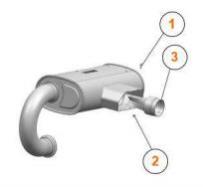
When using ethanol in your Speed UTV, use a top end VP racing lube to protect the engine. Follow the manufacturer’s instructions.
|
Be careful while working on the engine, the exhaust system, and the surrounding |
1. Remove the cargo bed to access the spark plugs ① .
2. Clean the area around the spark plugs before removing the plugs.
3. Remove the spark plug caps.
4. Using the spark plug wrench provided in the tool kit, remove the plugs by rotating them
5. Reverse the procedure for spark plug installation.
|
• Wear eye protection and gloves. • Do not perform clean-out immediately after the engine has been running. • Allow components to cool sufficiently before proceeding. |
2. Remove the spark arrester ③ .
4. Check for damage or wear, replace if needed.
5. Reinstall the spark arrester.
|
|
|
The three radiator fans are programmed to each turn on sequentially with respect to the water and engine temperature. This is to say that if all three fans are not running, the water and engine temperature are simply not at a point where all three fans are necessary to cool the radiator. |
 1. Ensure the vehicle is positioned level on a flat plane and stationery.
4. Remove the radiator and intercooler caps by twisting them off.
7. Remove any unwanted air by ‘burping’ the system.
9. Continue filling the system as necessary.
10.Replace the radiator caps once finished by twisting them back on.
|
|
|
Always wear appropriate PPE such as Gloves and Safety Glasses when working on the Speed UTV. |
1. Allow hot components to cool before performing this procedure.
2. Loosen the three latches around the perimeter of the CVT cover by pinching the locking lever (STEP A) to unlock the hook latch, pull on the hook latch (STEP B) to loosen the hook hold and release the latch (STEP C).
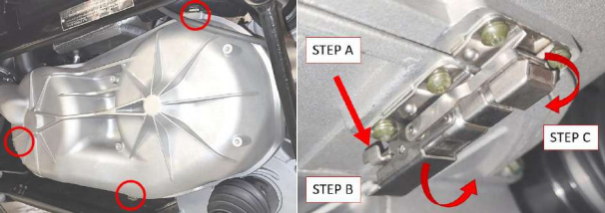
3. Remove the CVT cover ③ .
(NOTE: the air ducting to the CVT cover does not need to be removed as the cover can be laid to the side while accessing the CVT belt).
4. Thoroughly clean ALL DEBRIS from the CVT system, the primary clutch
① , and the secondary clutch ②.
5. Place a prying tool ⑥ between the metal fan front plate ④ and the bearing backing plate ⑤ on the secondary clutch ②.
(NOTE: ensure the prying tool is leveraged on the metal fan front plate, leveraging on other surfaces will result in damaging or breaking clutch components).
6. Use the prying tool ⑥ to pry the secondary clutch ② sheaves open.
|
|
|
Use the lady’s foot or pry bar from the Speed UTV toolbox to slightly open the sheaves to aid in debris removal and belt installation. |
|
|
|
The secondary clutch uses a spring with high spring force to compress the sheaves together during operation. When prying the sheaves apart, keep all hands and fingers clear as the pinch and nip points could result in severe injury. |
7. Remove the CVT belt by slowly turning the secondary clutch ② (with the prybar still holding the CVT open) until it dislodges or loosens completely.
8. Replace the CVT belt by first wrapping the belt completely around the primary clutch ①.
9. Slowly turn the secondary clutch ② (with the prybar still holding the CVT open) while guiding the CVT belt around the sheaves.
10.Keep turning the secondary clutch ② until the CVT belt is fully wrapped around both clutches.
11.Spin the secondary clutch ② until the clutch sheaves engage the belt. 12. Reinstall the CVT cover by securing the three (3) spring latches.
13.Ensure the air ducting is also re-attached to the CVT cover.
|
|
There may be some instances when water is accidentally ingested into the CVT system. Use the following instructions to dry it out before operating.
1. Remove the clutch cover.
2. Allow the water to drain.
3. Apply the brakes.
4. Place the transmission in PARK.
5. Start the engine.
6. Apply varying throttle for 10-15 seconds to expel the moisture and air-dry the belt and clutches. Do not hold the throttle wide open.
7. Allow the engine RPM to settle to idle speed.
8. Apply the brakes.
9. Shift the transmission to the lowest available range.
10.Test for belt slippage. If the belt slips, repeat the process.
11. If the belt continues to slip, your vehicle requires service as soon as possible. Reach out to your Speed UTV dealer or authorized person so they can assist.
|
|
|
When washing the vehicle, always avoid spraying water directly toward the CVT intake duct. See the Washing the Vehicle section for details. |
1. Inspect the brake lines for any leaks.
2. Inspect the brake calipers for any leaks.
3. Test the brake pedal for excessive or insufficient travel.
4. Check the brake pads for wear or damage.
5. Inspect the brake rotors for any indications of damage.
6. Ensure the brake rotor surface is clean of any residues by using an approved brake cleaner.
7. Evaluate the brake pad wear surface.
8. Replace pads ① when worn to 0.040” (1.0 mm) in thickness.
1. Ensure the vehicle is positioned level on a flat plane and stationery.
2. Place the transmission in PARK.
4. If the fluid level is lower than the low-level line, add brake fluid to the upper line.
5. Apply the brake forcefully for a few seconds and check for fluid leakage around the fittings.
|
Not all brake fluids are compatible with each other. Some brake fluids are glycol- based while others are silicon based. This means they cannot be mixed without |
Brake Fluid Compatibility Chart
|
|
||||
|
This chart does not indicate that the different brake fluids achieve the same |
Adjusting the ride height of the vehicle will impact the ride and suspension performance. The Speed UTV features Position Sensitive Shock Absorbers (PSSA) which have been specifically tuned for optimum performance.
|
|
|
For best suspension performance in a wide range of conditions ensure the ride height of the vehicle (measured from the ground to the flat portion of the belly skid plate) is between 15’’ to 16’’ (381mm to 406mm) at static ride height.
Ride height may settle overtime due to spring settling, this is not a warranty item and it is the owner’s responsibility for maintaining ride height. |
To adjust the ride height of the vehicle spring pre-load must be added or removed.
1. Position the vehicle on a level surface.
2. Washand clean the vehicle, ensure all dirt and dust is removed from shock bodies.
3. Measure and record the ride height from the ground to the flat portion of the belly skid plate at ① the front and ② the back of the passenger compartment.
5. Loosen the pinch bolt ③ in the top spring perch ⑥ .
6. Record the distance between the bottom of the reservoir cross over
⑤ and the top of the top spring perch ⑥.
7. Spin the top spring perch ④ using a tool to gain leverage to compress the spring:
8. Remeasure and compare the distance 囚 (new) to the 囚 (old).
10.Lower the car to the ground.
11.Bounce and roll the car forwards and backwards to allow the suspension to settle.
13.Tighten ③ the pinch bolt in the top spring perch.
|
Do not attempt to disassemble the shocks possibility of accident, severe injury, or death.
|
2. Using an Allen key and wrench loosen the jam nut.
4. Using an Allen key and wrench tighten the jam nut.
The Speed UTV shocks feature a rebound adjuster which can be used to stiffen or
damping, follow the steps below:
2. Using an Allen key and wrench loosen the jam nut.
4. Using an Allen key and wrench tighten the jam nut.
1. Ensure there is NO vehicle power before removing the battery (TURNED OFF)
2. Remove the rear center console panel.
3. Disconnect the black (NEGATIVE) battery cable first,
4. Secure the loose cable away from the battery terminals.
5. Disconnect the red (POSITIVE) battery cable last.
6. Remove the battery hold-down strap.
7. Lift the battery out of the vehicle.
1. Ensure that the battery is fully charged.
2. Place the battery in the battery holder.
3. Coat the terminals with dielectric grease or petroleum jelly.
4. Secure the battery hold-down strap.
5. Connect and tighten the red (positive) cable first.
6. Connect and tighten the black (negative) cable last.
7. Verify that cables are properly routed.
8. Install the battery hold-down strap and the rear center console panel.

|
# |
A |
MODEL |
FUNCTION |
|
K1 |
20 |
HFV9 12-H-R |
RELAY, ROOF LIGHT |
|
K2 |
30 |
HFV11 12-H-R |
RELAY, LOW BEAMS |
|
K3 |
30 |
HFV11 12-H-R |
RELAY, HIGH BEAMS |
|
K4 |
20 |
HFV11 12-H-R |
RELAY, POSITION LIGHTS |
|
K5 |
20 |
HFV9 012-1ZR |
RELAY, AMP DISABLE |
|
D1 |
|
DTN-DD |
EMERGENCY SWITCH, LOW SIGNAL |
|
D2 |
|
DTN-DD |
EMERGENCY SWITCH, HIGH SIGNAL |
|
D3 |
|
DTN-DD |
PKE, TURN SIGNAL, LEFT |
|
D4 |
|
DTN-DD |
EMERGENCY SWITCH, LOW SIGNAL |
|
D5 |
|
DTN-DD |
EMERGENCY SWITCH, HIGH SIGNAL |
|
D6 |
|
DTN-DD |
PKE, TURN SIGNAL, RIGHT |
|
F1 |
30 |
Mini, APM/ ATM |
AUXILLARY EQUIPMENT |
|
F2 |
5 |
Mini, APM/ ATM |
FUSE, BCM/PKE |
|
F3 |
7.5 |
Mini, APM/ ATM |
FUSE, WINCH/HORN |
|
F4 |
20 |
Mini, APM/ ATM |
FUSE, TRAIL |
|
F5 |
7.5 |
Mini, APM/ ATM |
FUSE, HEAD LIGHTS |
|
F6 |
2 |
Mini, APM/ ATM |
FUSE, FASH |
|
F7 |
7.5 |
Mini, APM/ ATM |
FUSE, DASH/PKE/BCM/STARTER RELAY |
|
F8 |
5 |
Mini, APM/ ATM |
FUSE, DI HARNESS |
|
F9 |
15 |
Mini, APM/ ATM |
FUSE, DC (FRONT) / USB (FRONT) |
|
F10 |
25 |
Mini, APM/ ATM |
FUSE, ROOF LIGHT |
|
F11 |
7.5 |
Mini, APM/ ATM |
FUSE, WIPER PUMP |
|
F12 |
15 |
Mini, APM/ ATM |
FUSE, WIPER BLADE |
|
F13 |
20 |
Mini, APM/ ATM |
FUSE, RADIO |
|
F14 |
15 |
Mini, APM/ ATM |
FUSE, HEAD UNIT |
|
F15 |
2 |
Mini, APM/ ATM |
FUSE, BRAKE LIGHTS |
|
F16 |
10 |
Mini, APM/ ATM |
FUSE, INTERIOR LIGHTS |
|
F17 |
10 |
Mini, APM/ ATM |
FUSE, AUXILLARY LIGHTS |
|
F18 |
15 |
Mini, APM/ ATM |
FUSE, CHASE LIGHT |
|
F19 |
15 |
Mini, APM/ ATM |
FUSE, CHASE LIGHT POWER |
|
F20 |
5 |
Mini, APM/ ATM |
FUSE, BACKLIGHTS |
|
F21 |
3 |
Mini, APM/ ATM |
FUSE, TURN SIGNALS |
|
F22 |
10 |
Mini, APM/ ATM |
FUSE, AIR PUMPER |
|
F23 |
7.5 |
Mini, APM/ ATM |
FUSE, SEAT HEATING |
|
F24 |
10 |
Mini, APM/ ATM |
FUSE, MIRROR LIGHT |
|
F25 |
15 |
Mini, APM/ ATM |
FUSE, BUMPER LIGHT |
|
# |
A |
MODEL |
FUNCTION |
|
K1 |
20 |
HFV11 12-H-R |
RELAY, DBW |
|
K2 |
30 |
HFV9 012-1ZR |
RELAY, EFI |
|
K3 |
30 |
HFV9 012-1ZR |
RELAY, COILS |
|
K4 |
20 |
HFV11 12-H-R |
RELAY, FUEL PUMP |
|
K5 |
20 |
HFV11 12-H-R |
RELAY, CVT COVER FAN |
|
K6 |
35 |
HFV9-C 12-H-R |
FAN 1, LEFT |
|
K7 |
35 |
HFV9-C 12-H-R |
FAN 2, MIDDLE |
|
K8 |
35 |
HFV9-C 12-H-R |
FAN 3, RIGHT |
|
F1 |
5 |
Mini, APM/ ATM |
FUSE, DBW |
|
F2 |
10 |
Mini, APM/ ATM |
FUSE, EFI SYSTEM (ECU#1/RECORD) |
|
F3 |
15 |
Mini, APM/ ATM |
FUSE, COILS |
|
F4 |
20 |
Mini, APM/ ATM |
FUSE, FUEL/WATER PUMP |
|
F5 |
10 |
Mini, APM/ ATM |
FUSE, CVT FAN |
|
F6 |
4 |
Mini, APM/ ATM |
FUSE, STARTER RELAY |
|
F7 |
2 |
Mini, APM/ ATM |
FUSE, CVT BELT TEMP SENSOR |
|
F8 |
10 |
Mini, APM/ ATM |
FUSE, ECU |
|
F9 |
7.5 |
Mini, APM/ ATM |
FUSE, OXYGEN |
|
F10 |
5 |
Mini, APM/ ATM |
FUSE, ETHANOL SENSOR (ECU#2) |
|
F11 |
2 |
Mini, APM/ ATM |
FUSE, GYROSCOPE |
|
F12 |
15 |
Mini, APM/ ATM |
FUSE, DC SOCKER / USB CHARGER |
|
F13 |
30 |
Mini, APM/ ATM |
FUSE, AUXILLARY EQUIPMENT |
|
F14 |
3 |
Mini, APM/ ATM |
FUSE, MAIN RELAY |
|
F15 |
2 |
Mini, APM/ ATM |
FUSE, FAN CONTROL |
|
F16 |
30 |
Mini, APM/ ATM |
FUSE, FAN 1, LEFT |
|
F17 |
30 |
Mini, APM/ ATM |
FUSE, FAN 2, MIDDLE |
|
F18 |
30 |
Mini, APM/ ATM |
FUSE, FAN 3, RIGHT |
1. Pull the lock pin ① upward to unlock the case.
2. Follow the arrow on the case and turn to remove the bottom half.
4. Inspect the intake tube for debris.
6. Follow the arrow to reinstall the case and push down the pin to lock.
|
Do not clean the air filter with compressed air, use a brush to remove loose debris. |
|
|
|
|
|
|
|
Always ensure the vehicle is stable and securely supported when removing wheels.
1. Move the vehicle to a sturdy level surface.
2. Shift the gear selector into PARK.
4. Loosen the lug nuts slightly.
6. Place an additional safety stand under the frame.
Always ensure the vehicle is stable and securely supported when installing wheels.
1. Ensure the gear selector is in PARK.
2. Align the wheel holes with respect to the wheel hub.
4. Mount the wheel to the wheel hub.
5. Fasten the lug nuts snuggly but do not fully tighten.
6. Check to make sure the area under the vehicle is clear.
7. Take care in lowering the vehicle to the ground.
8. Torque the lug nuts to specification.
9. See the Axle and Wheel Nut Torque Specifications section for details.
2. Select a mild detergent or a specialized UTV cleaning solution that is designed for off-road vehicles.
3. Avoid using harsh chemicals or abrasive cleaners that can damage the paint, plastics, or seals.
4. Start by spraying the surfaces with a cleaning solution working from top to bottom.
5. Use a soft brush or sponge to gently scrub areas.
6. Pay attention to hard-to-reach areas such as under fenders, suspension, and engine.
7. Use a separate brush or sponge to clean the wheels and tires.
8. Thoroughly rinse the vehicle with a garden hose or pressure washer on a low setting.
9. Remove all traces of soap or cleaning solution
|
While cleaning, regularly inspect for loose bolts, damaged parts, or signs of wear. |


